Guidelines
for
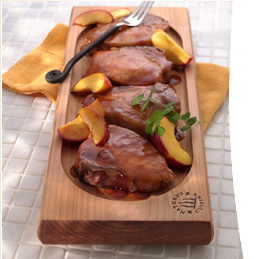
Oven-roasting planks
- Rub olive oil on the plank surface
- Heat plank in oven to 350° for 15 minutes
- Roast seafood, meat, poultry, vegetables and more
- Serve it in style - right from the plank
- Easy, warm water clean-up
To get the most out of your plank & your Nature’s
Cuisine Cooking experience, read
the full description of guidelines.
Full Description of Guidelines for Oven-roasting
Planks
BEFORE USING A NEW PLANK: New planks must
be seasoned the first 1 to 3 times before roasting foods.
We recommend using olive oil (vegetable oil will also work)
for seasoning. Pour 1 to 2 tablespoons of olive oil into
a small bowl. Use a paper towel or soft clean cloth dipped
into the oil and lightly coat the top surface of the plank
with oil. Do not apply oil on the underside of the plank.
Always heat the plank for 15 minutes (Refer to PREHEATING
DIRECTIONS below) following recipe directions before placing
food on the plank to roast. After several uses, the plank
will have turned a rich brown color and no longer require
any additional seasoning.
KEEP STEEL RODS TIGHT: It is characteristic
of wood to develop fine cracks or warp when it’s heated.
To counteract this, steel tightening rods have been inserted
along the ends of the plank. When the plank is new before
each use, tighten the rods just until snug with the adjustment
tool supplied with the plank, or by using a 7/16-inch socket
wrench. After the plank has been used several times the
wood will settle and the rods will only need occasional
adjustments to keep them snug.
PREHEATING AND POSITIONING THE PLANK IN THE OVEN:
Placing the plank properly in the oven is important. Set
the oven rack in a medium to upper position in the oven.
Place the plank on the rack, then set the oven temperature
to ‘Bake’ at 350° F. This sterilizes the
plank and allows it to heat gradually. Placing the plank
in the middle of the oven also allows heat to flow around
the all sides of it so it becomes thoroughly hot and foods
cook evenly. Allow the plank to heat at least 15 minutes
before placing food on it.
NOTE: Oven planks are not to be used in barbecues or grills.
PLACING FOOD ON THE PLANK Leave the heated
plank on the oven rack and pull out both plank and rack
together to place food on the plank. This eliminates moving
a hot plank around the kitchen. Always place a hot plank
on a heatproof surface.
COOKING TEMPERATURES Follow the recommended
cooking temperatures specified for each recipe. Ovens may
vary, but do not allow the plank to get so hot that it starts
to excessively smoke, as most home ventilation systems cannot
handle the heavy smoke. Do not raise the oven temperature
above 400°F.
COOKING TIMES Recipes give suggested cooking times. Actual
cooking times may vary according to the type and thickness
of the food being cooked, as well as the quantity of food
placed on the plank. Allow for extra time if recipe quantities
are increased or if additional items are added to the plank
while roasting.
INTERNAL ROASTING TEMPERATURES While personal
preference is the key factor in evaluating doneness, using
an internal probe meat thermometer is a reliable way to
determine whether meat, poultry or game is completely cooked.
CAUTION! Since the plank absorbs heat and is hot when it’s
removed from the oven, always wear oven mitts or use potholders
when handling it or using it as a serving tray. Never leave
a plank unattended in the oven. Be sure to place the plank
on a heatproof trivet, never directly onto the table, to
protect surfaces from heat.
CONVECTION OVENS This type of oven will
reach cooking temperatures faster and reduce cooking times.
Allow the plank to preheat at 150°F. Gradually increase
the heat every 10 minutes to reach the required temperature.
Monitor the cooking time carefully so as not to overcook
the food.
CLEANING YOUR PLANK We recommend cleaning
Nature’s Cuisine wood planks within one hour of use
to maintain the full woodsy aroma. To clean your plank,
use a soft bristle brush, warm water, and mild dish soap
to scrub down the plank surface. Never put your plank in
the dishwasher.
NATURAL CHARRING After several uses the
bottom of your plank will begin to char. This is an ongoing
natural process that’s desirable because it lends
a smokier essence to foods.
REKINDLE A FRESH AROMA Sanding a heavily
used plank will restore its smoky aroma. Use medium grit
sandpaper and sand within the oval surface area. Once a
plank has been re-sanded, season it again with cooking oil
before its first use. It is not necessary or recommended
to sand the underside of the plank, which naturally darkens
with use over time.
|
|
Guidelines
for
BBQ Grilling Planks
- Soak plank for at least 1 hour.
- Heat grill to medium-high, (400°-425°F)
- Place prepared plank on grill, close lid and heat for
2 minutes
- Turn plank over, close lid and heat for an additional
2 minutes
- Once plank begins to crackle place food on plank and
re-close lid
To get the most out of your grilling plank & your Nature’s
Cuisine
Cooking experience, read
the full description of guidelines.
Full Description of Guidelines for BBQ Grilling
Planks
Soak plank for at least 1 hour to
add moisture and resist burning while on the grill. To spice
up the flavor, add 1-tablespoon salt to water.
For even more zest, try adding dry white
wine, apple cider, citrus or berry juice.
Prepare barbecue according to manufacturer’s instructions.
Temperature should be medium-high (400°-425°F).
For first time use, season the plank by
lightly toasting each side before cooking food. This imparts
more intense flavor and helps prevent warping. Place prepared
plank onto grill and close lid. After a few minutes, the
plank will begin to smoke and crackle.
• Place food on plank and close lid.
NOTE: Plank cooking times will vary, depending on the food
and recipe.
Caution: If grill becomes too hot, the plank may start
to burn; use a spray bottle filled with water to extinguish
any flames, adjust heat and continue cooking.
When you are finished grilling, place your hot plank in
a container of water, (coolers work well). This will
prevent your plank from reigniting as it cools and will
also help extend the life of any remaining wood, in the
event you would like to reuse your plank.
Tip: If the plank is charred through, crumble it into bottom
of your barbecue and use as smoking chips.
NOTE: If the plank is not completely blistered, you can
reuse it. Simply rinse clean with warm, soapy water. Let
dry. Re-soaking is optional. |